-
Buying Guide
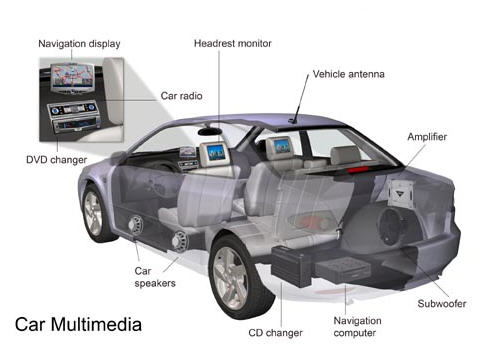
Car multimedia systems are great for entertaining passengers on long rides. They often include DVD players, car lights, car gps navigation, and car security alarms and security systems.
Many systems also allow multizone playback, meaning the rear-seat passengers can enjoy watching a DVD, while the front-seat passengers can listen to music or vice versa.
Choosing Your Car DVD Player
Our website sells two different kinds of DVD player. The first is a universal player, which can be installed in just about any vehicle make and model. The other is a vehicle-specific player which is specially-designed for a particular model. Our vehicle-specific players will indicate in the product title the model of car for which it is designed.
If you choose a universal player, please first check the player position height of your car. If the height is 50mm, please select from the 1 Din series, and if 100mm, please select from the 2 Din series.
Antitheft Protection
There is a variety of ways a system can help to prevent theft, including a detachable faceplate, a masking faceplate, or by requiring a custom code to turn on the system after being disconnected from the battery. At the very least, we suggest you choose a car DVD player with a detachable faceplate for added safety.
Functions
RDS: Communications protocol standard for embedding small amounts of digital information in conventional FM radio broadcasts. RDS standardizes several types of information transmitted, including time, station identification and program information.
iPOD: Allows you to connect your iPhone or iPod and play music via the Car DVD Player.
Steering Wheel Control: Full control of all multimedia functions through your steering wheel. No need to take your hands off the wheel to set the volume, change channels, or change the song.
PIP: Picture in Picture (PiP) is a feature that allows one program (channel) to be displayed on the screen at the same time as one or more other programs are displayed in an inset window.
GPS (Global Satellite Navigation): A great feature that lets you Install GPS maps such as TomTom, route66, igo8, Sygic.
Analog TV: Uses the Old Analog Broadcasting Frequencies to reviece video channels and displays them on the Screen.
Bluetooth: Provides hands free connectivity between your cell phone and the car DVD player, allowing for a safer driving experience.
Wi-Fi (Wireless Internet): Get online when within a Wireless Network Range.
3G Internet (True World Wide Coverage): With 3G you can check email, surf the web and more through your 3G network carrier.
Touch Screen: Allows you to control and navigate the UI (user interface) with the touch of your finger.
Detachable Panel: For added security, you can detach the front panel and take it with you, a great theft deterrent.
Swivel Screen/Panel: For added comfort and convenience to all passengers. This allows you and your passengers to watch movies in comfort and without viewing restrictions.
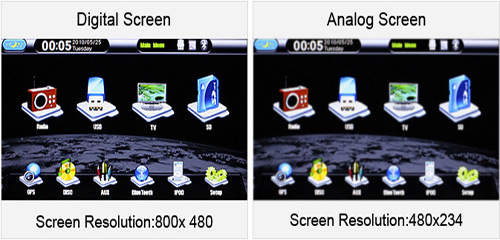
Digital Screen VS Analog Screen:
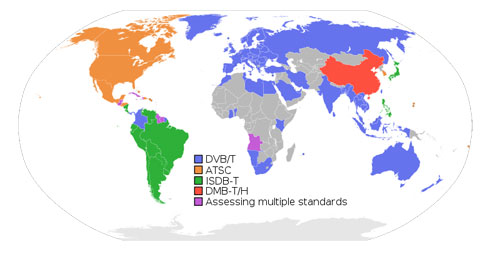
DVB-T, ISDB-T, ATSC:
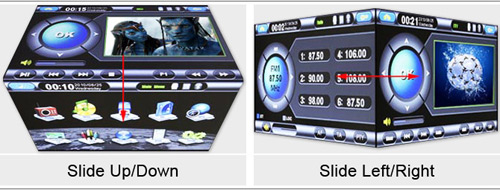
3D Interface: Slide on the screen can show 3D interface and change mode as following:
TV:
Analogue Television NTSC PAL SECAMSECAM Regions The United States,Japan,Korea,
Philippine,Bolivia,Venezuela,
Chile,Columbia,Mexico,Peru,
Canada,Israel,China Taiwan,etcChina,Indonesia,India,Jordan,Malaysia,
Pakistan,Qatar,Singapore,Thailand,Turkey,
Yemen,Austria,Belgium,Denmark,Finland,Greece
,Iceland,Ireland,Italy,Malta,Holland,
Germany,Norway,Romania,Spain,Sweden,
England,Switzerland,Algeria,Argentina,
South Agrica,Brazil,Jamaica,Australia,
New Zealand, Hong Kong, Macao,etc.France,Iraq,Iran,Saudi Arabia,
Ukraine,Russia,Hungary,Roumania,
Czechoslovakia,Bulgaria,Hungary,Egypt,etc.Digital Television Europe Japan The United States China DVB-T ISDB-T ATSC-mh DMB-TH/CMMB Product Model IDT1808D-01C ISD3900N-01C NO ICM5001-01C IAT1908D-01C ICM5002I-01C Regions Germany,France,Italy,Spain and others Europe countries(It is not suit for Northern Europe);Taiwan,Indonesia,Saudi Arabia and other Middle East countries;Russia,Australia. See deailed www.dvb.org Japan,Brazil,Argentina,Chile,Uruguay,Paraguay etc. America, Canada China,Hongkong China
-
Return & Replacement
I’ve received a product with a quality problem, what next?
• Products with quality problems, including shipping damage, can be returned for a refund or replacement within 7 days.
• Products with quality problems, including shipping damage, can be returned within 30 days for a replacement.
• Products with quality problems, including shipping damage, can be returned within 365 days for repairs.
Please note: We only allow a complete refund for items with shipping damage or factory defects. Any defects not caused by LightInTheBox will not warrant a full refund.
Incomplete Shipments
If the package doesn't include all the accessories and parts it was shipped with, the cost of the accessories and parts will be deducted from the total product price and a partial refund will be issued. Please contact us immediately about retrieving the missing parts.
Can I send the product back if I am unsatisfied with it?
We only offer a return service for those items which are factory defective or incorrectly included in your shipment. Please read our Return Policy before placing your order.
If I receive a wrong item, can I return it for a refund?
In the event you receive the wrong item, please notify our customer service immediately. You will be asked to ship the item back to us, in which case we will refund your shipping cost. You may then request a refund or have us replace your erroneously shipped item with the correct one. Contact Customer Service: https://www.lightinthebox.com/index.php?main_page=account
Shipping & Delivery
How many shipping methods do you offer?
a. Standard Shipping:
EMS is standard shipping and usually takes 6-10 business days for delivery. Products are generally shipped 2-4 working days after we receive the payment and your contact phone number.b. Expedited Shipping:
We use Fedex, UPS, DHL or TNT for expedited shipping, generally taking 5-8 business days for delivery. Most products will be shipped out within 2-3 working days after receiving payment and your contact phone number.c. Air Mail:
For air mail, delivery time is between 15 - 20 days for all major destinations. Shipping cost is low, although the delivery time is a bit longer. Order tracking and shipping insurance are not available with this shipping method.Delayed Orders
If your order is delayed, you can track it by logging in, accessing My Orders, selecting your order and finding the third party tracking number. In the event no tracking number is available, please open a ticket and contact customer service immediately.
-
Car Electronics FAQs
1. I would like to order a car GPS navigator or a car DVD player with a GPS function. How can I find out if the Car DVD Player with GPS function works in my region?
2. When driving, why does a warning audio alert “For your safety, do not watch.” emanate from the car DVD player without video display?
3. What does Dual Zone function mean?
4. Does the USB port of car DVD player identify flash drives and external HDD?
5. When I play videos on my iPod on the car DVD player, why is there only sound but no video displayed?
6. Why is my DVD disc only going in half way into the DVD player?
7. Why was I unable to save Radio channels that I tuned into?
8. My radio can only work on FM frequency but cannot on AM, what can I do?
9. How would I be able to find out whether a car DVD player is compatible with a rearview camera?
10. How can I know if a car DVD player is compatible with my car?
11. Is it possible to watch different movies on car headrest DVD player set?1. I would like to order a car GPS navigator or a car DVD player with a GPS function. How can I find out if the Car DVD Player with GPS function works in my region?
^Top We offer a selection of SD and TF cards with GPS maps for you to select from. You can select the SD or TF card that corresponds to your region.
2. When driving, why does a warning audio alert “For your safety, do not watch.” emanate from the car DVD player without video display?
^Top This is a safety measure taken by the manufacturers. It prohibits drivers from watching videos while driving. The safety protocol can be disabled by connecting the brake line to the ground wire.
3. What does Dual Zone function mean?
^Top With Dual Zone function, car DVD players can play DVDs while GPS is in operation mode. 4.Does the USB port on the car DVD player identify flash drives and external HDD?
^Top Does the USB port on the car DVD player identify flash drives and external HDD? USB ports on car DVD players do not work with external HDDs, but they do support USB flash drives with a storage capacity of up to 16GB. 5. When I play videos on my iPod on the car DVD player, why is there only sound but no video displayed?
^Top Different car DVD players support different iPod versions. Please check the product description to see whether the iPod Video can be displayed on the car DVD player. If the description states that the iPod Video is supported, but you are still experiencing problems displaying the video, the problem might be caused by the iPod cable or the car DVD player itself. . 6. Why is my DVD disc only going half way into the DVD player?
^Top There are two screws in the top surface of the player; they are put in place to keep the car DVD player safe during shipping. Unscrew and remove them and try again. 7. Why was I unable to save Radio channels that I tuned into?
^Top Why was I unable to save Radio channels that I tuned into? Please connect the yellow B+ line to your car battery. If the battery is not running (off), Radio Tuners can be successfully saved. Otherwise, the car DVD player will be restored to factory settings. 8. My radio can only work on FM frequency but not on AM, what can I do?
^Top You can switch the AM/FM mode by pushing the BND button. 9. How would I be able to find out whether a car DVD player is compatible with a rearview camera?
^Top Why was I unable to save Radio channels that I tuned into? Please connect the yellow B+ line to your car battery. If the battery is not running (off), Radio Tuners can be successfully saved. Otherwise, the car DVD player will be restored to factory settings. 10. How can I know if a car DVD player is compatible with my car?
^Top LightInTheBox offers universal car DVD players and car DVD players specifically for branded vehicles. For universal DVD players, customers must select it with the corresponding mounting dimension (the height of the original Radio or CD player) which is 1 DIN (50mm in height) or 2 DIN (100mm in height). For in-dash car DVD players specific to branded vehicles, make sure to check the product description and specifications to find out which branded Vehicle is the car DVD player designed for. 11. Is it possible to watch different movies on a car headrest DVD player set?
^Top If the set includes two DVD players, the two players can display different movies. Make sure more than one DVD player is included in your set if you’re interested in this function.
-
Installation
Thank you for purchasing our car video system. Before you get started, please read the following installation guide.
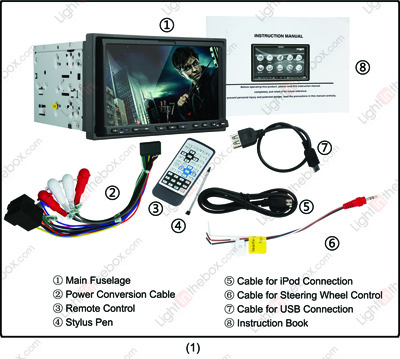
1. The Car Video system is comprised of: Main Fuselage, Power Conversion Cable, Cable for Steering Wheel Control, Cable for iPod Connection, Cable for USB Connection, Remote Control, Stylus Pen, and Instruction Book.
2. Turn the video system around, and you’ll find two conversion cables in the back. The one in the top right corner is for the AV cables. The one in the lower left corner is for power cables. Read on for installation instructions.
3. Before installing the car video system, please remove the two screws on the top of the fuselage.
4. Please remove the CD player and the front panel.
5. Please take the original fixed support (steel casing), and fasten it to the car video system.
6. Here is the car radio antenna cable.
7. These two cables from the car video system are for digital TV and GPS.
8. The blue interface is the power wiring harness from the car.
9. The ISO interface (the black one) is a conversion cable from the video system. Because the conversion cable from the car and the cable from the video system don’t match, please cut off the ISO interface.
NOTE: Do not cut off the blue interface, you may need that if you have a specialized car video system.
10. In order to connect with the original power wiring harness, you’ll need to cut off the ISO power wiring harness (the black box). After you’ve cut that off, connect all the wires from the car and car video system one by one.
11. Picture (11-a) is the power B+ wire (B+ for battery), please connect this one with the 12V+ from the car battery. Connect it like in Picture (11-b). Picture (11-c) is the ACC wire with the key power line. Connect like in Picture(11-d)
NOTE: Battery wire and ACC wire colors may vary depending on your vehicle. Please consult your car’s owner manual for details.
12. Here is the GND wire, please connect this wire with the negative pole.
13. These are the left-front speaker wires from the car video system. The first white one(solid colored) should be connected to the positive pole, while the second white wire(black striped) should be connected to the negative pole. Please connect the two wires with the original car left-front speaker wires.
14. These are the right-front speaker wires from the car video system. The first grey one(solid colored) should be connected to the positive pole, while the second grey wire(black striped) should be connected to the negative pole. Please connect the two wires with the original car right-front speaker wires.
15. These are the left-rear speaker wires from the car video system. The first green one(solid colored) should be connected to the positive pole, while the second green wire(black striped) should be connected to the negative pole. Please connect the two wires with the original car left-rear speaker wires.
16. These are the right-rear speaker wires from the car video system. The first purple one(solid colored) should be connected to the positive pole, while the second purple wire(black striped) should be connected to the negative pole. Please connect the two wires with the original car right-rear speaker wires.
17. The pink wire is the brake-in wire. When you connect the brake-in wire with the parking brake wire, you cannot use the DVD player while driving. This is safe mode. To release safe mode, connect this wire with the negative Pole (GND), thus enabling you to use the DVD player while you’re driving.
18. This is the reverse –in wire (18-a). Please connect this wire with the car’s reverse wire. Connect it like in Picture (18-b).
19. This is the headlight wire. Please connect this with the car headlight wire’s positive pole.
20. This is the power wire for the telescopic antenna (ANT). If your car doesn’t have an antenna wire, please cover this up with insulating tape.
21. This is an amplifier wire. If there is no amplifier in your car, please wrap this wire with insulation tape.
22. The final connection should look like this.
23. From the right hand side there is a steering wheel control cable, iPod cable, Analog TV antenna (ANT), and a rear-view camera cable.
24. These picture show installation of the steering control cable, with the red interface on one side connected to the DVD video system. The other side has three wires which are marked key1-5v, key2-5v and GND. Connect key1-5v (usually brown), key2-5v (usually white) with the control wire of the steering wheel. The GND wire should be connected with the negative pole. If your car does not support steering wheel control function, please cover the three wires with insulating tape.
25. When installing the rear view camera, usually there are two wires. One is video-out, usually yellow, which should be connected to the video-in wire of the car video system (Picture 25-b). The other is the camera’s power wire, usually red, which should be connected to the car parking light positive and negative (Picture 25-c, 25-d).
NOTE: You can use extension lines if your power wire is not long enough. If you have installed a stereo, you can connect the other AV cable by the tag. If not, please wrap up the remaining cable with insulating tape (Picture25-e). The final connection should look like this (Picture25-f).
26. Connect the radio antenna cables from the car and the car video system (like in Picture 6).
27. According to the marks on the back side of the car video system, take the wire from the car video system and link the GPS and DTV antenna with the ports from the car (usually the ports are gold). We suggest putting the GPS and DTV antenna on the top right of dashboard.
NOTE: The black side of GPS box should be facing up.
28. Here’s what the completed connection should look like.
29. Now replace the frame, and enjoy your new car video system.